ZoneVu's Splice Log tool allows you to splice together two or more Log Curves to use as a single curve. Each Log Curve Channel can be normalized and conditioned independently, allowing you to create a single unified curve that displays the rock or Well properties in a consistent way. Once you have completed the Well, you can export this Normalized Spliced Log out of ZoneVu in an .las.
This article will detail how to create, edit and export a Spliced Log.
Creating a Spliced Log:
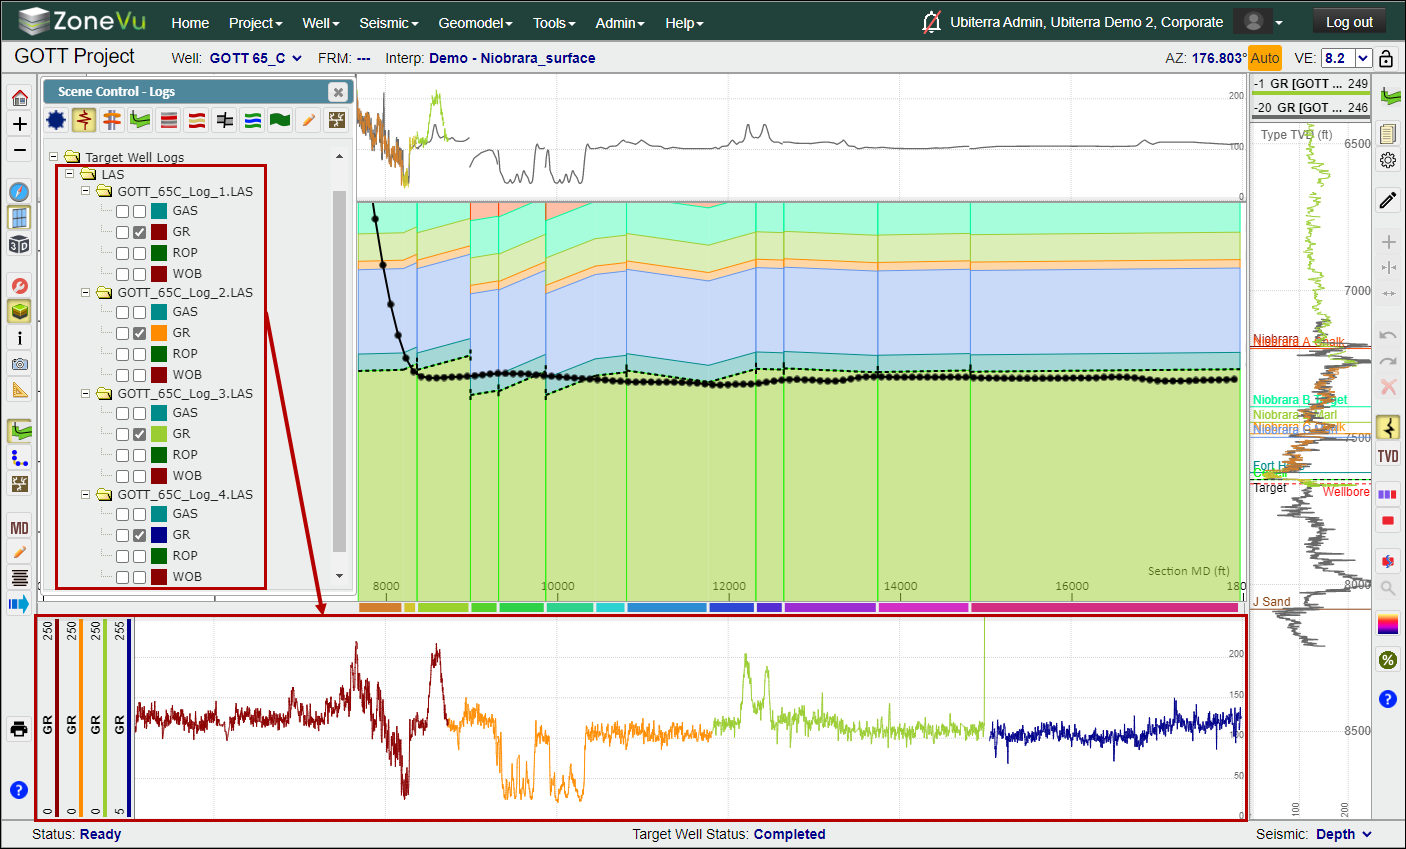
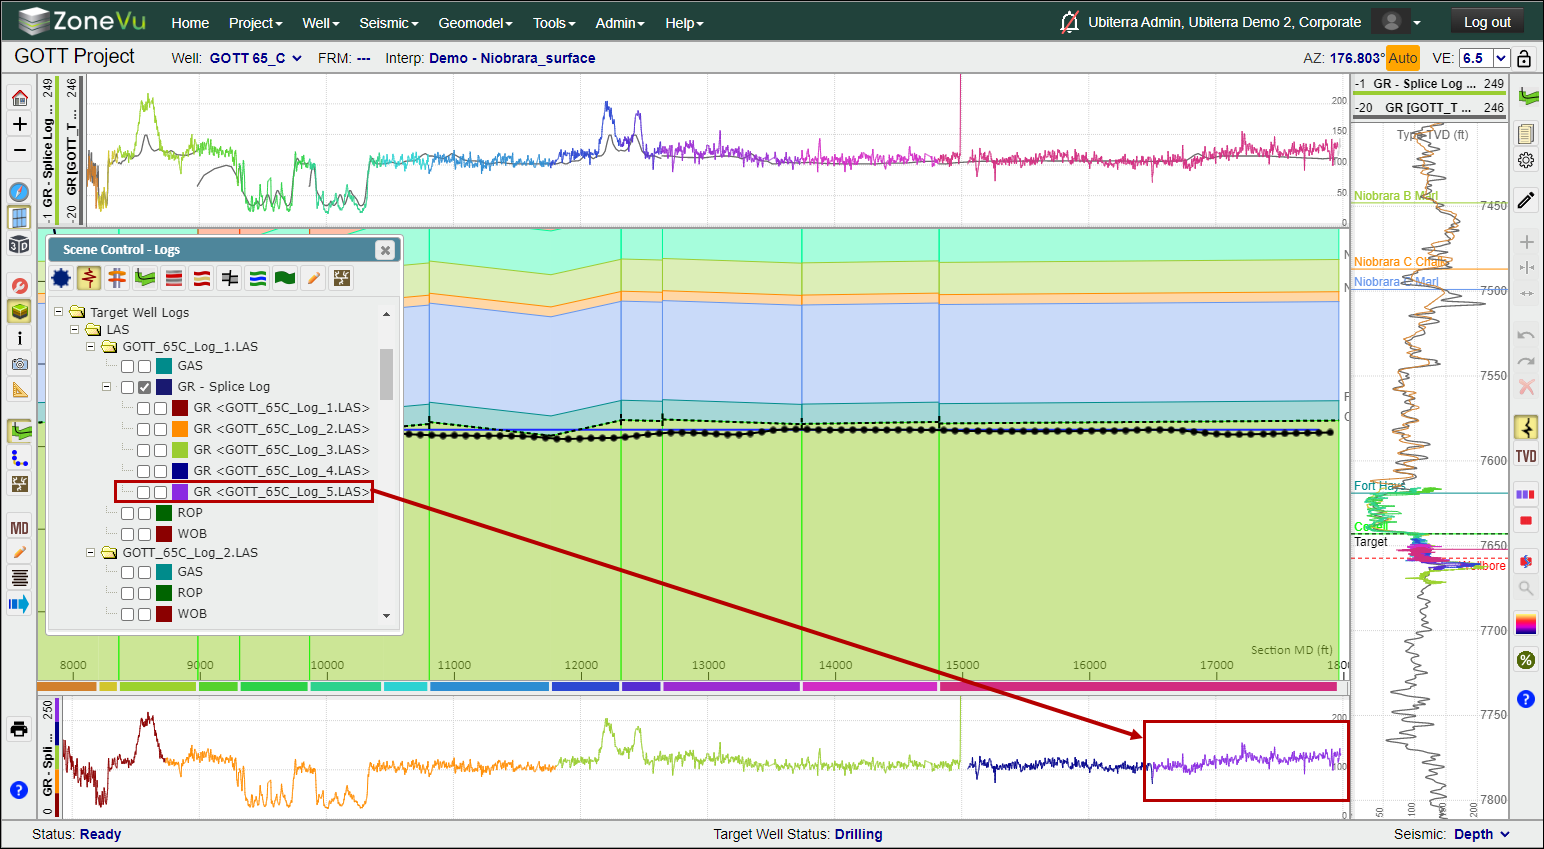
In the example below, this Well has had several BHA changes along the Lateral. Instead of working with 4 log curves in the Vertical and Horizontal Tracks, ZoneVu can splice these log curves together creating a single Spliced Log.
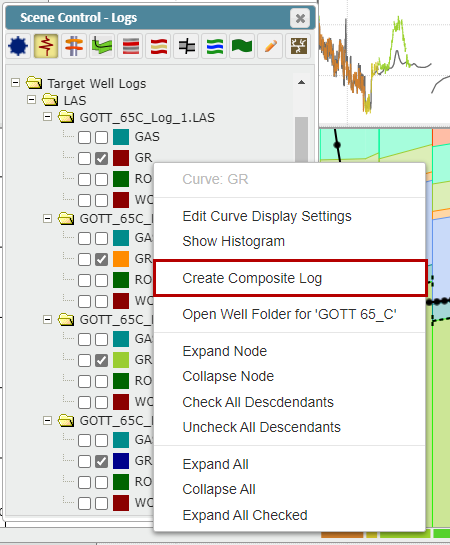
First, go to the "Logs" tab in Scene Control and find the Log you want the Splice Log to be housed in. This Log must have a Curve that will be used in the Spliced Log. Right-click on the Log Curve and select "Create Composite Log"
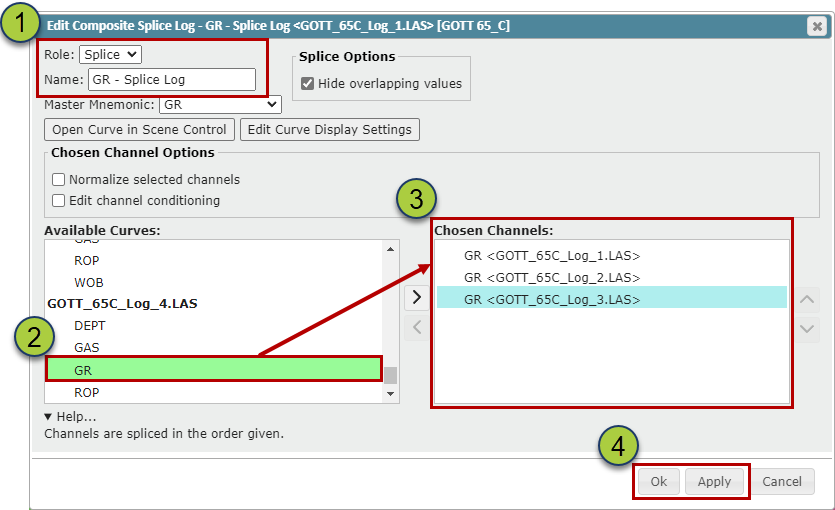
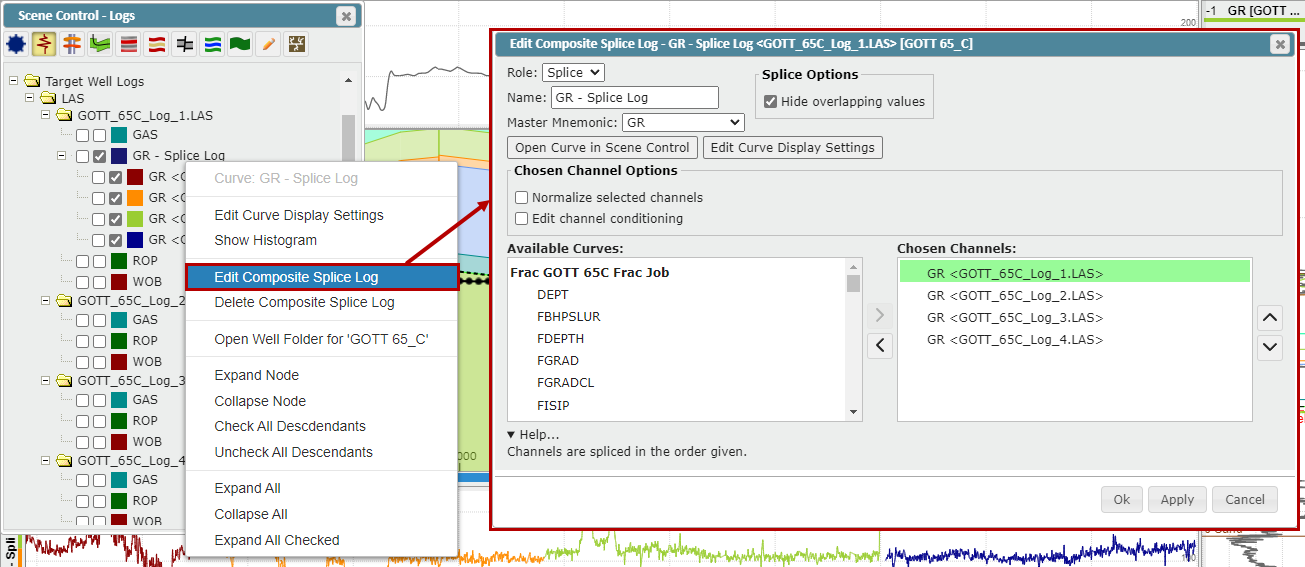
The Edit Composite Log dialog box will open.
Use the "Role" dropdown to select "Splice" and name the Splice Log in the Name input
Search through the log list in the "Available Curves" and use the ">" button to move the needed Log Curves over to the Chosen Channels list
Order the Log Curves from shallowest to deepest using the "Up/Down Arrow" buttons. This order will be used for data prioritization if there are overlapping data from the Splice Log Curve Channels
Click the "OK" or "Apply" button to create the Splice Log
The newly create Splice Log will be placed in the Log that was first selected. Also, all Log Curve Channels used in the Splice log will be moved from their original Log and nested under the Splice Log.
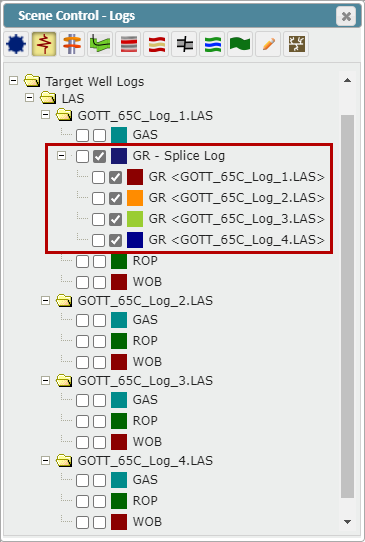
When you place the Splice Log in a Log Track, the Log Header Color Bar will display the Channel Log's Color and order. You can now use this Splice Log to display all of the Log Channel data with a single log, simplifying your Log data display
Editing the Spliced Log:
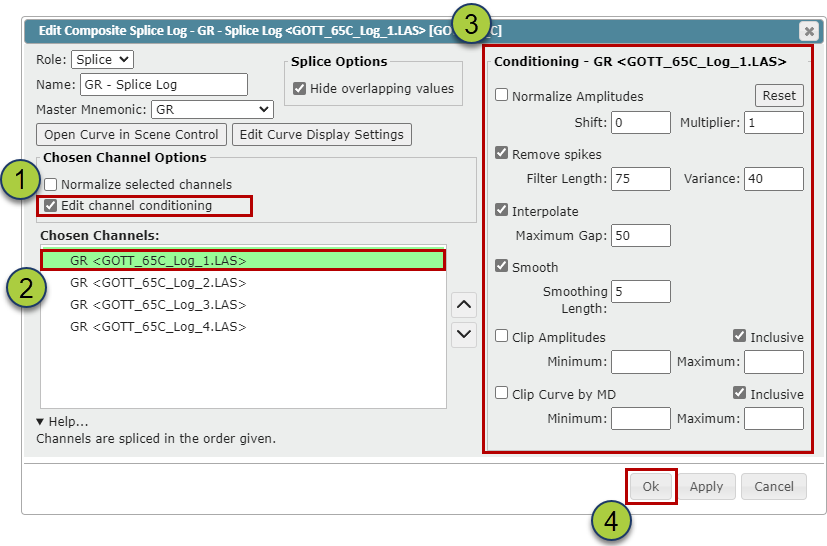
After you have created a splice, you can add/edit what Curve Channels are used, apply conditioning parameters to each Curve Channel, and/or normalize each Curve Channel. To open the "Edit Splice Log" dialog back, right-click on the Splice log name in Scene Control and select "Edit Composite Splice Log".
Adding a new Channel to the Spliced Log:
In the "Edit Composite Log" Dialog Box, find the new GR curve in the Available Curve List
Use the “>” button to move the selected curve to the Chosen Channels list
Click the “OK” button to save these changes.
Note: If your Curve is not displaying correctly, try adjusting its position in the Curve Channel list
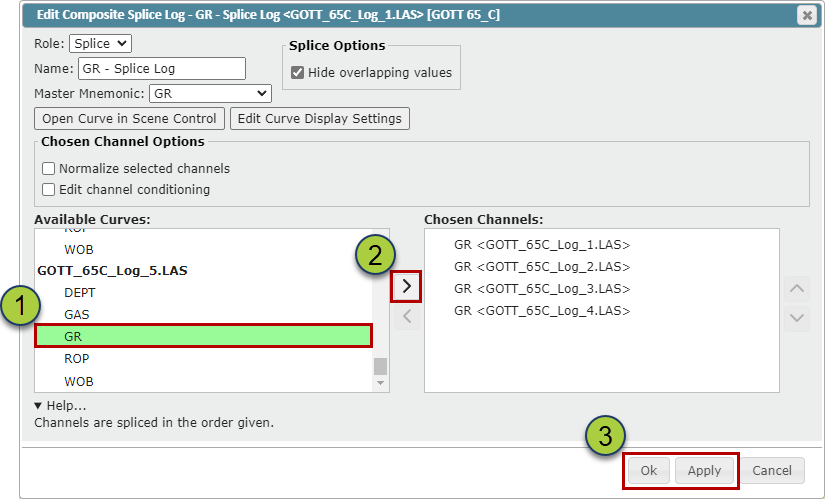
The new curve will now be used in the existing Splice Log.
Apply Conditioning Parameters to Curve Channels:
You can apply a unique set of conditioning parameters to each Curve Channel, similar to what's found on the "Conditioning" tab in the Log Display Settings dialog box.
Check the "Edit channel conditioning" checkbox
Choose a Curve Channel to condition
Select and apply the Curve Conditioning parameters you want to apply to this Curve Channel
Repeat this process on all Curve Channels you need to adjust
Click the "OK" or "Apply" to apply these changes
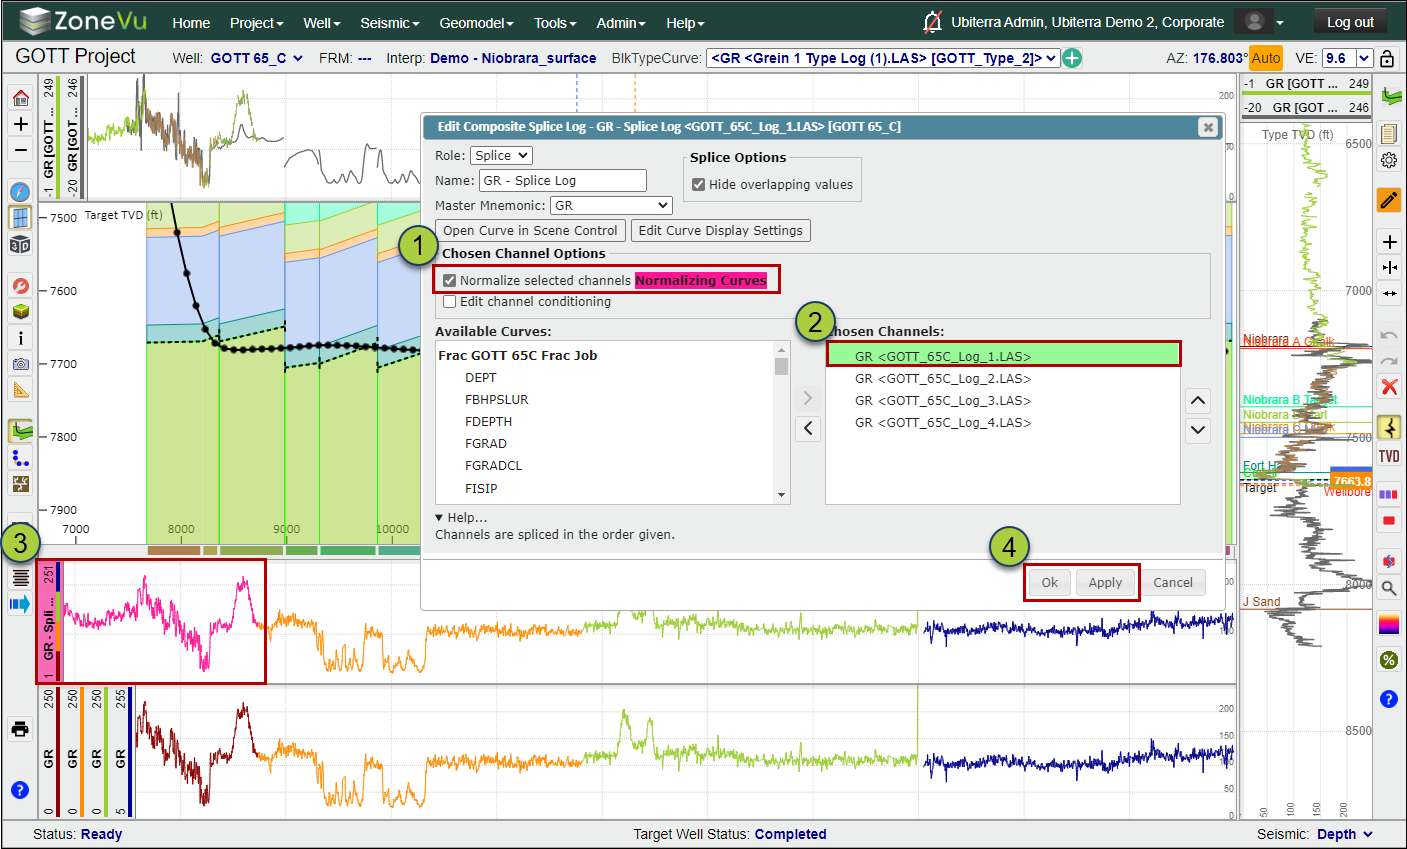
Normalizing Curve Channels:
If a Curve Channel in the Splice Log has a data shift or amplitude variance, you can normalize one or more Curve Channels so that the Splice Log displays the same amplitude and value for the same segment of rock despite what the original Curve's data may show. This allows the Splice Log to have a consistent and unified reading and display. These normalization parameters will be applied to the exported Splice Log data.
Check the "Normalize selected channels" checkbox
Select a Curve Channel to Normalize
The Log Header of the splice log will be highlighted pink indicating that you are in Normalization Mode. The log segment associated with the selected Curve Channel will also be colored pink. In the log track adjust the scale log positioning and any other display parameters. These changes will only be applied to the selected Curve Channel.
Click the "OK" or "Apply" to apply these changes
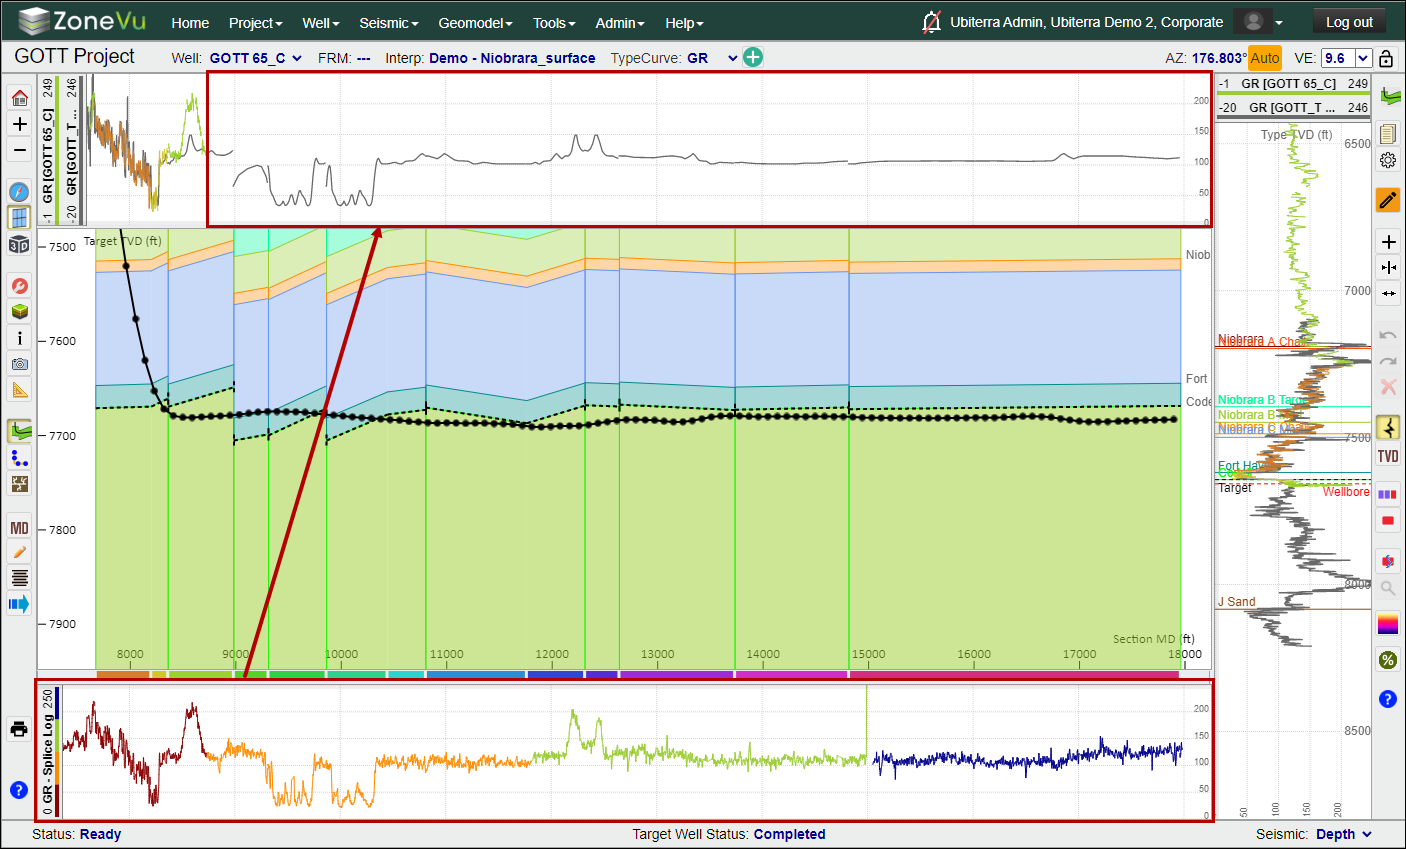
Making the Splice log the LWD Log:
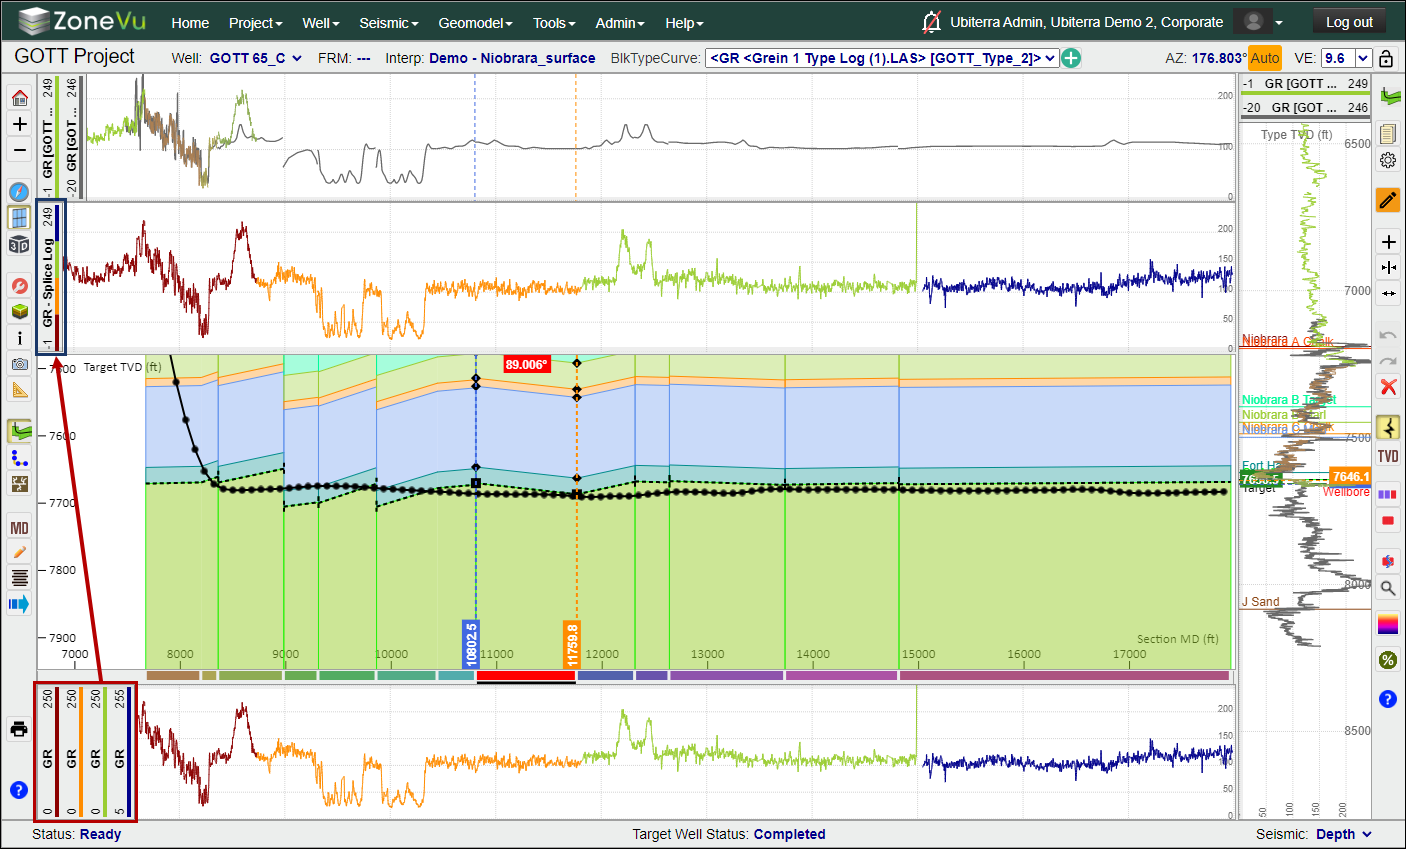
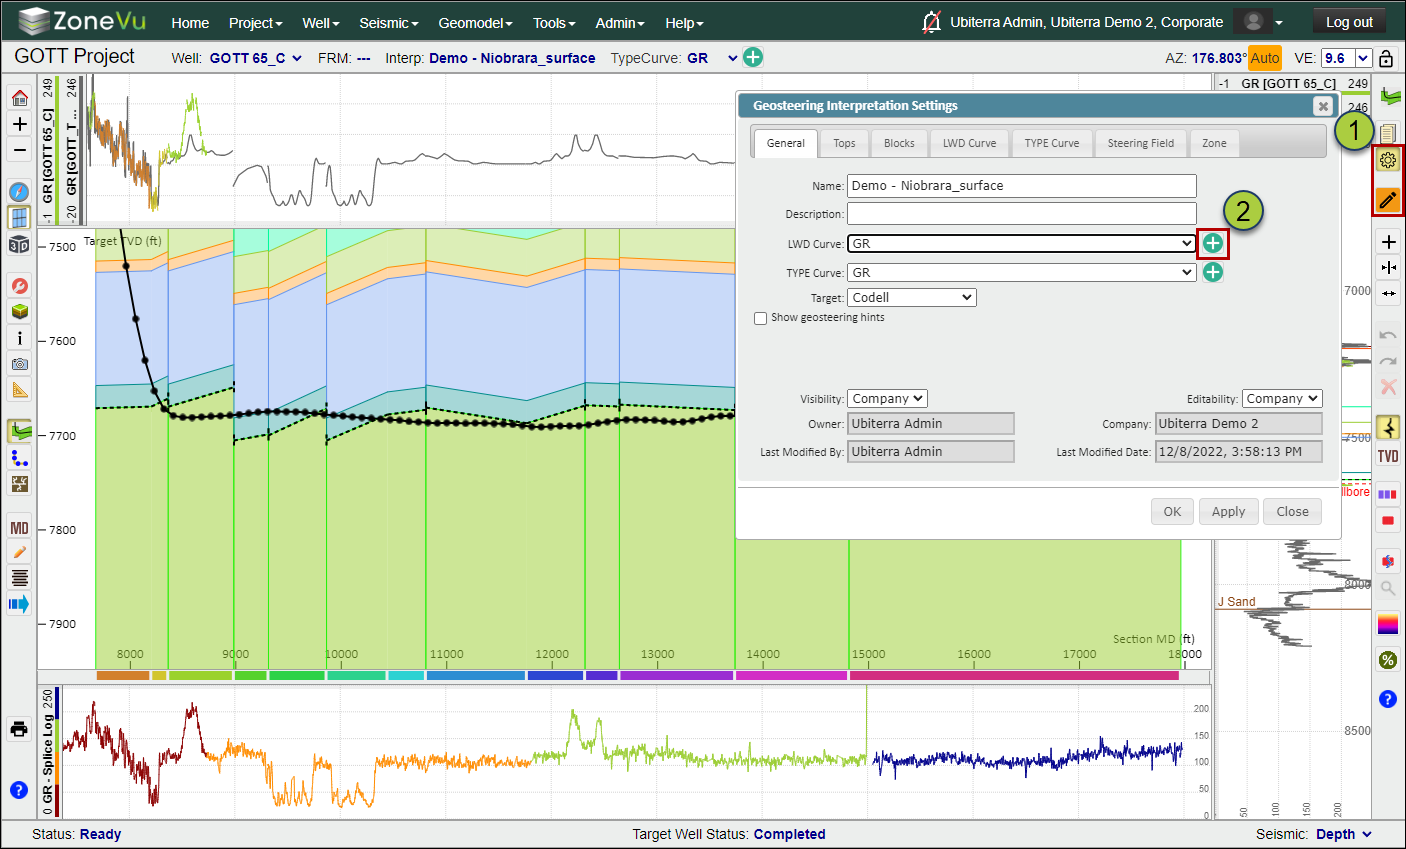
Once you have created a Splice Log, you can assign this Splice Log to the LWD curve. This allows you to splice together multiple RigStream Logs and/or LAS files, removing the need to display multiple logs in the same track to see the entire dataset while you Geosteer. In the example below, we have created a Splice Log that covers the entire Lateral, but the displayed Geosteering Interpretation is using the LAS data from the Vertical and Curve BHA.
Open the Geosteering Interpretation Settings and make sure you are in Active Geosteering Edit Mode
Click the green "+" button next to the "LWD Curve" dropdown to open the "Curve Selection" dialog box
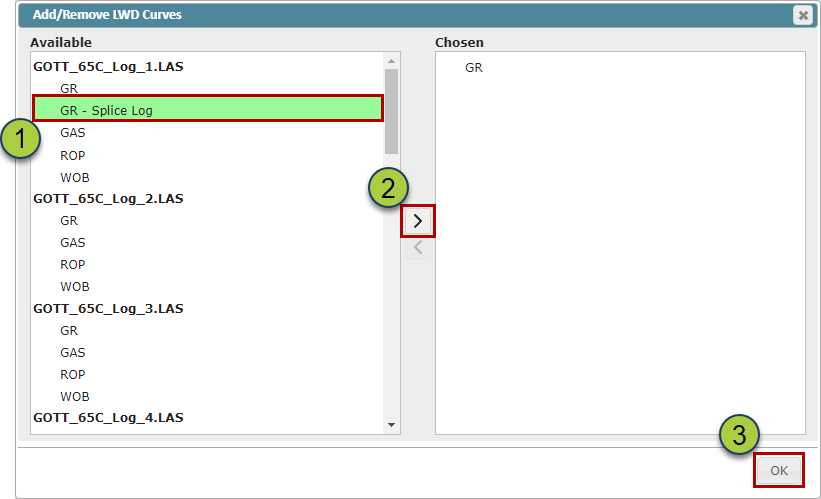
Search through the log list to find and select the Splice Log
Use the ">" button to move the Splice log to the "Chosen" list
Click the "OK" button to save your selection
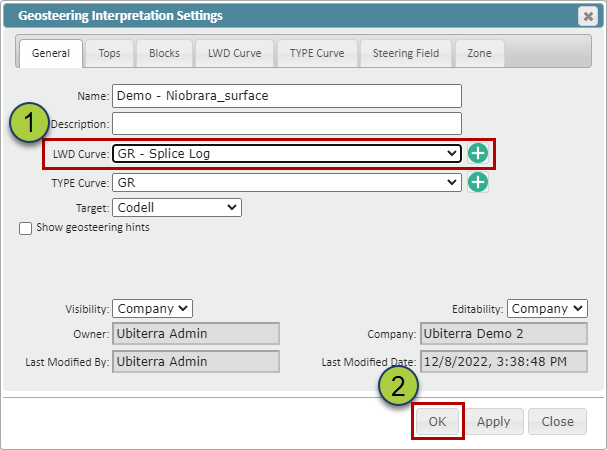
Use the LWD Curve" dropdown to assign the Splice Log as the active LWD Curve
Click the "OK" button to save your changes
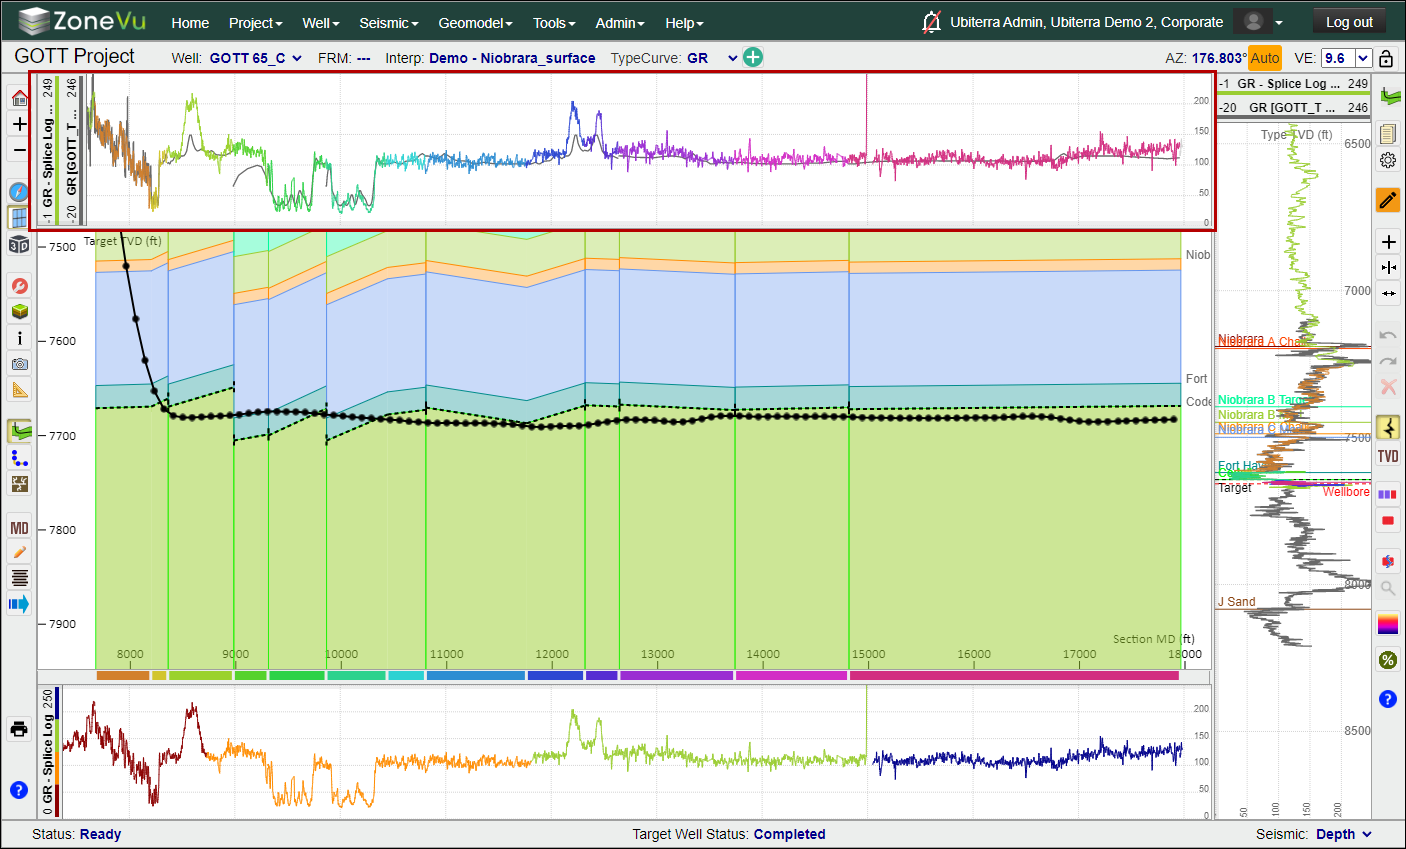
The Splice Log data will now be used in the LWD Curve, allowing you to only manage one log curve for geosteering. If another BHA change occurs, then the only step you will need to take is adding this new Log Curve to the Curve Channels in the Composite Log Settings dialog box.
Exporting the Spliced Log:
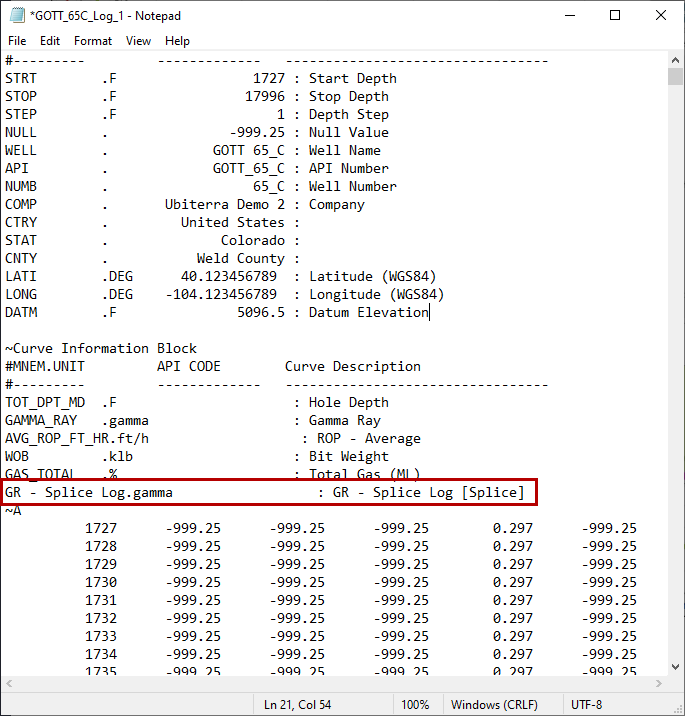
ZoneVu can generate a normalized Log from the Spliced Log. This log will be added to the Log that houses the Splice Log in the Viewer.
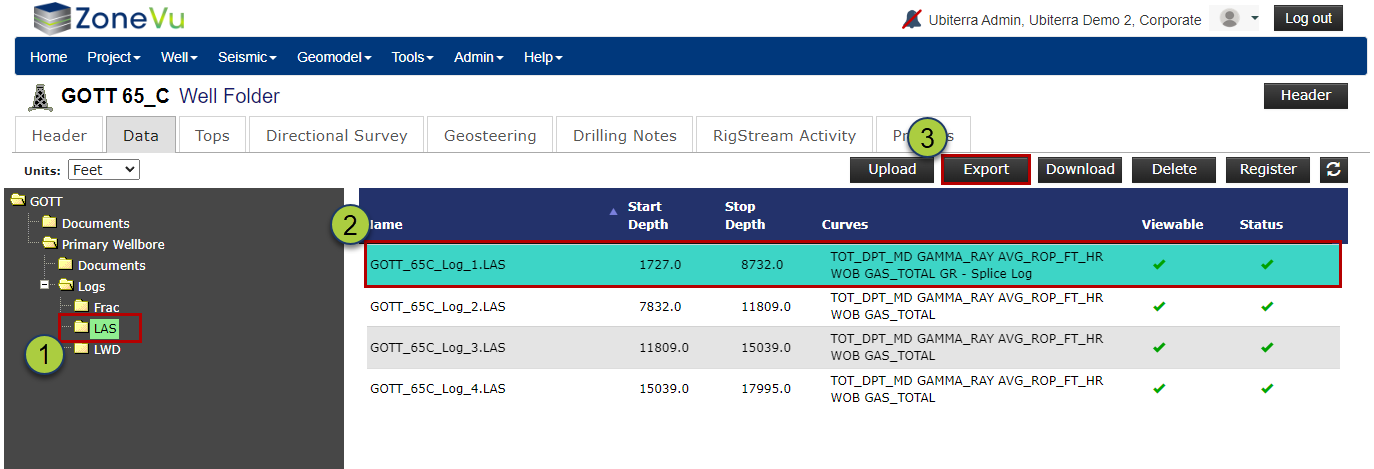
To export this normalized Log, first go to the "Data" tab in the Log folder and Select the Subfolder the Log is saved in
Select the Log from the Log List
Click the "Export" button to export the LAS file
The Splice Log will be added to the end of the .las file