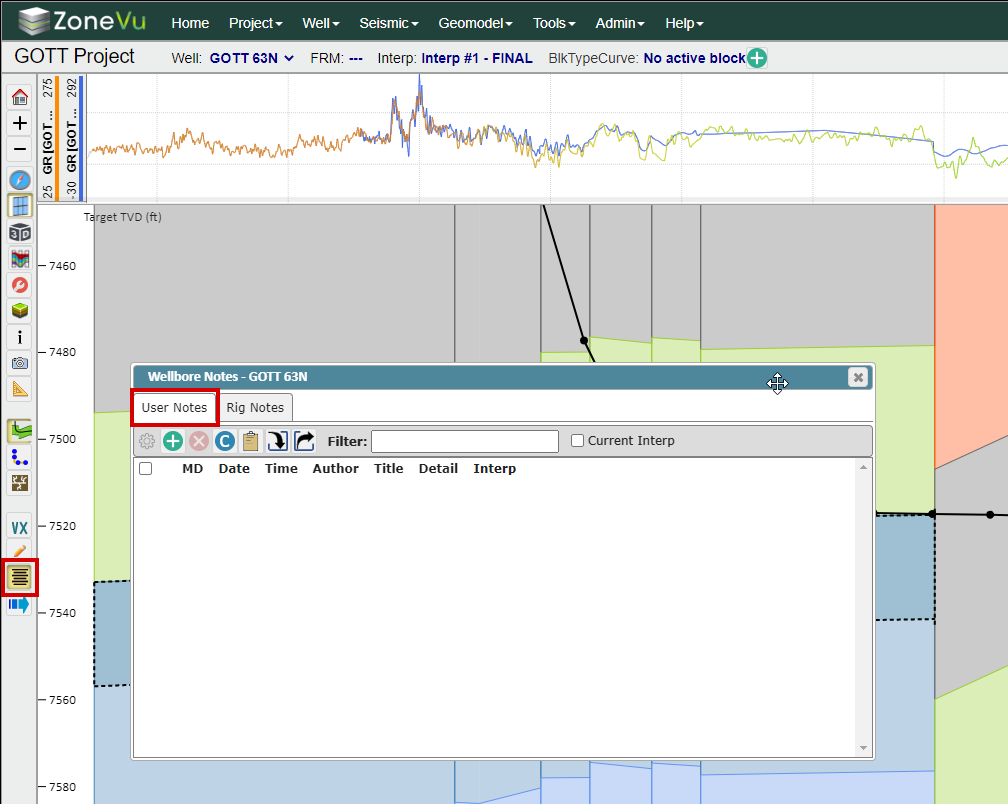
To open the User Notes dialog, click the 'Wellbore Notes' button near the bottom of the Main Button Tree.
How to create a new User Note:
There are two ways you can create a new User Note
Right-click on the cross-section in the 2D Viewer and select "Create User Notes"
Click the green 'Create' button in the User Notes tab of the Wellbore Notes dialog
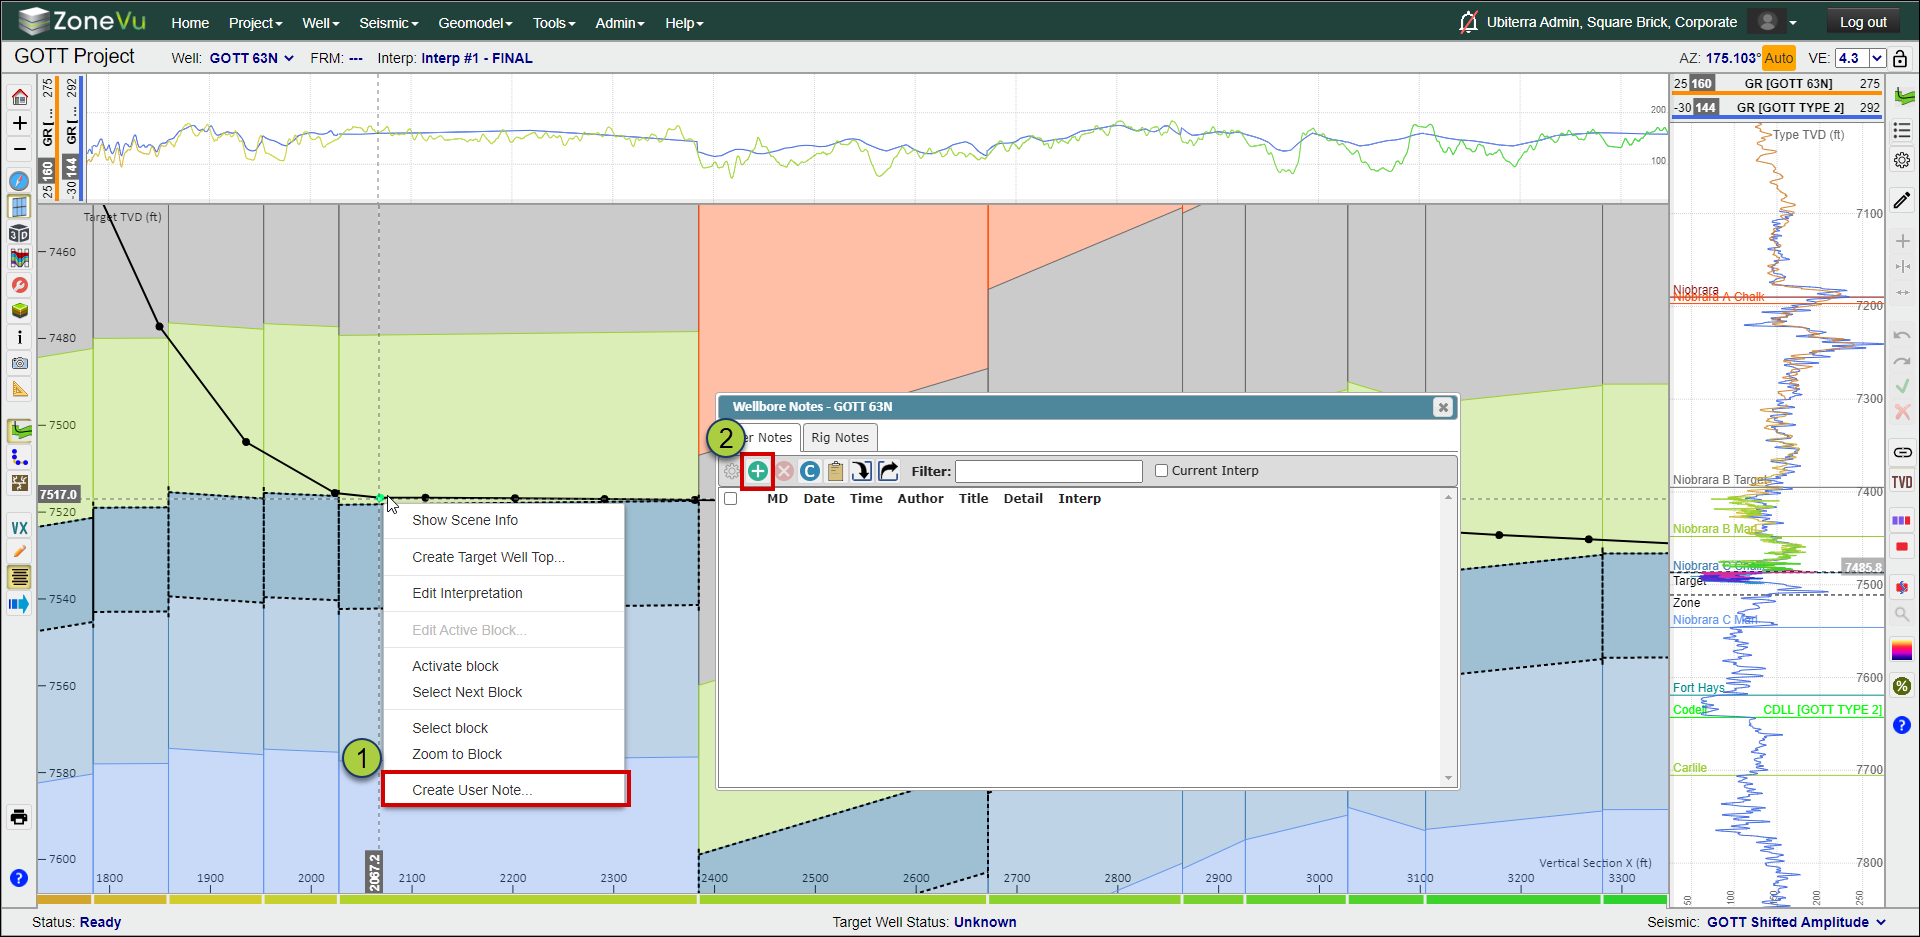
This will open the Create User Note dialog
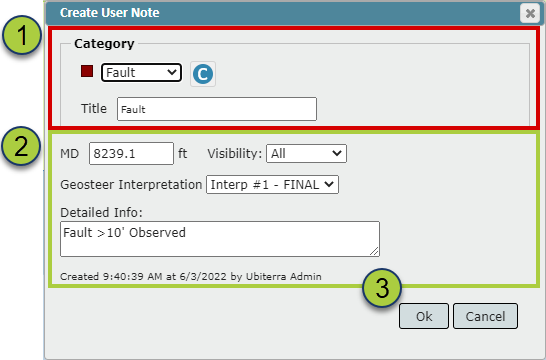
Select a Category
Note: All User Notes must have a Category, and the 'None' Category can be used to house User Notes that do not have an existing Category
Title: The 'Title' field will be auto filled with the Category Title (unless the 'None' Category is selected). You can change or edit the auto-filled input if you wish
Input Data:
MD: If you used the right-click option, ZoneVu will auto-fill with the selected MD depth
Visibility: Similar to Geosteering Interpretations you can control the visibility of the new User Note (All, Company, Owner)
Geosteering Interpretation: If a Geosteering Interpretation is active, ZoneVu will auto-fill this field with the active Geosteering Interpretation. Use the dropdown to change the associated Geosteering Interpretation
Detailed Info: This section allows you to add any details about the User Note being created. If the assigned Category has information in the details section, this info will be transferred to the new User Note. This info will be visible in the Wellbore Notes list, but not along the wellbore
Click 'OK' to create your new User Note
Creating a New User Note Category:
ZoneVu lets you create categories to help organize the User Notes made along a wellbore and speed the creation of new User Notes
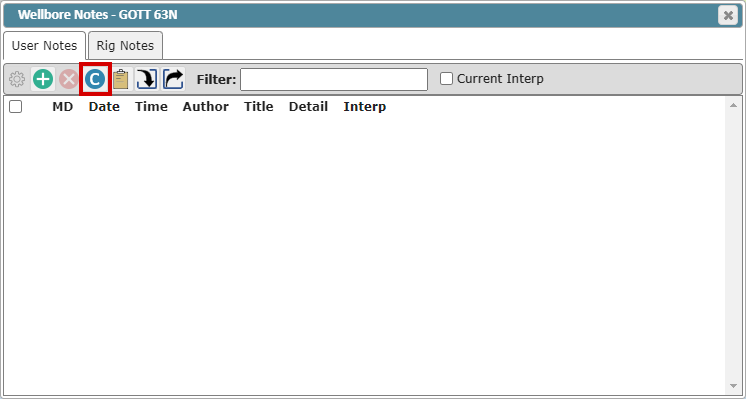
To access the Wellbore Notes Categories, click the blue 'Category' button. This will open the Wellbore Notes pop-up listing all Categories. It's important to note that Categories are saved at the corporate level. Any category created will be visible on every Well and every Project in your ZoneVu account
In the Wellbore Notes Categories dialog, you can edit the settings of an existing Category, create a new Category, and delete an existing Category
Note: Deleting a Category will not delete the associated User Notes; instead, these User Notes will be reassigned to the 'None' Category
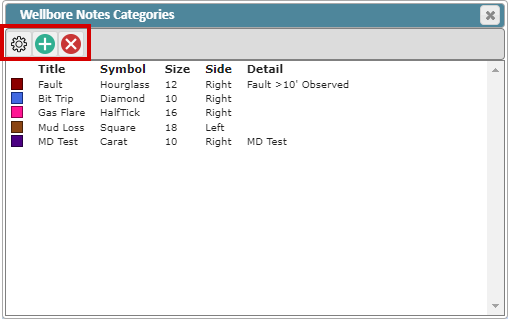
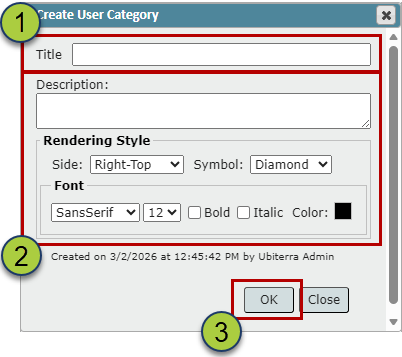
To create a new Category, click the green 'Create' button to open the Create a Category dialog

Title: This is what will be listed in the Category dropdown. Also, this will be the default text displayed along the wellbore, and this can be edited when you create a new note
Description (optional): Input a description for the new Category. Any text input into the description will be auto-populated into the User Note Description box
Rendering Style: Customize the Category text and symbol
Side: Specifies which side of the wellbore the text will be displayed on: Right/Above or Left/Below
Symbol: Specifies what symbol will be drawn at the defined wellbore location (Diamond, Carat, Tick, HalfTick, Circle, Hourglass, & Square)
Font Style: SansSerif, Serif, Times, Monospace, Cursive
Font Size: Will scale the Text and Symbol
Bold and Italic checkboxes: Set the text to Bold, Italic, or both
Color: Color will define the color used for the text as well as the symbol
Click the 'OK' button to create the new Category
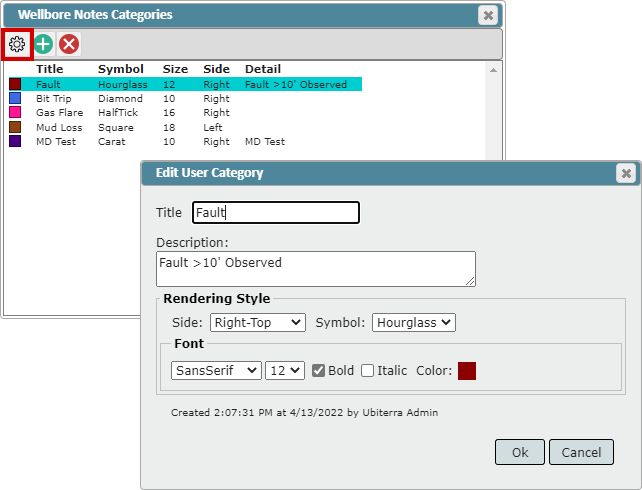
How to edit an existing Category:
To edit an existing Category, select the category you want to edit and click the 'Edit user note category' button. This will open the Edit User Category pop-up
Once you have finished making edits, click "OK" button to save the changes
User Notes are ordered from deep to shallow. Hovering over a note will place a red crosshair along the wellbore at the assigned MD depth
When a User Note is created or edited, ZoneVu will capture the MD depth, date/time, and author
You can use the bulk On/Off checkbox to turn On/Off all displayed User Notes.
Note: If there are User Notes that have been filtered out, these hidden notes will not be affected by the bulk On/Off checkbox
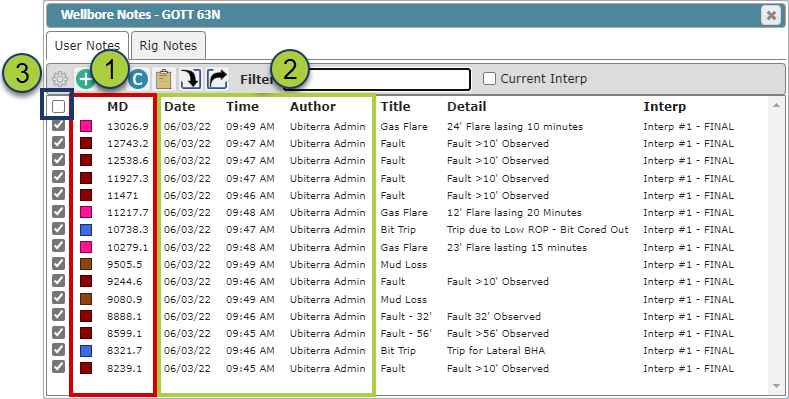
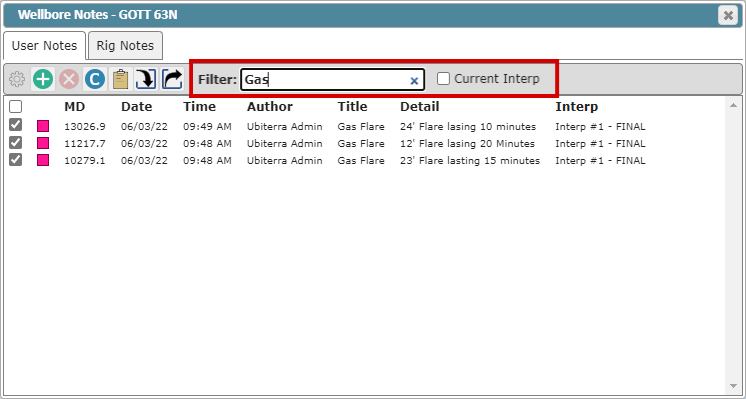
You can use the Filter Box to filter the displayed User Notes by MD depth, author, title, or details
'Current Interp' checkbox: Will display only the User Notes associated with the active Geosteering Interpretation
How to edit an existing User Note:
To edit an existing User Note, select a User Note and click the 'Edit User Note' button
This will open the 'Edit User Note' dialog. Make the desired changes and click 'OK' to apply
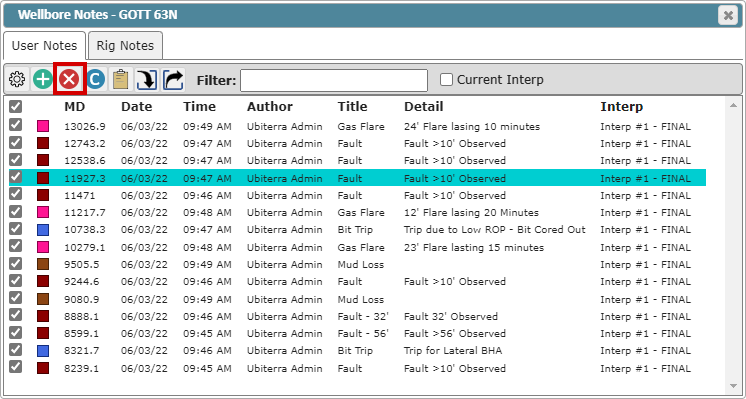
Deleting a User Note:
You can select a single User Note or SHIFT + Select or Ctrl + Select to select one or more User Notes. Then click the red 'Delete' button
Note: This operation cannot be undone
How to export the User Notes:
Click the 'Copy to Clipboard' button to copy the User Notes to your computer's clipboard
or
Click the 'Export' button to export the User Notes as a .txt file
Note: You can also import User Notes by clicking the 'Import' button
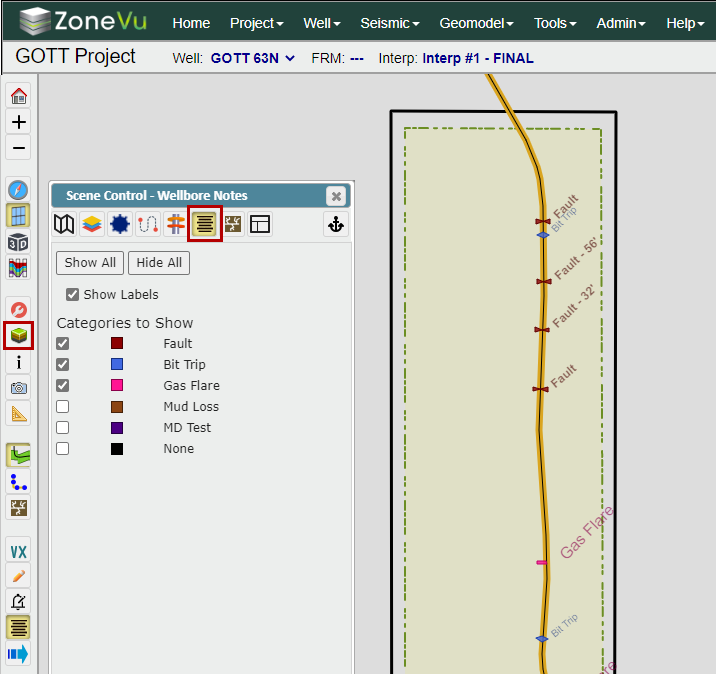
Displaying User Notes in the Map Viewer:
To display User Notes in the Map Viewer, open Scene Control and select the 'Wellbore Notes' tab
Use the checkboxes next to each Category to turn on all the User Notes for every displayed Well in the Category (similar to Well Tops).
Click the 'Show All' or 'Hide All' button if needed.
Click the 'Show Labels' checkbox to display the label in the view
Note: You can open the Well Notes dialog in the Map Viewer to create, edit, or delete existing User Notes. You must use the Wellbore Notes tab in the Scene Control to display User Notes in the Map Viewer